How to Uninstall or Remove Internet Explorer
Posted Sept. 5, 2018, 1 a.m. by Marcos González R.With all the Web Browsers available, such as Mozilla Firefox, Google Chrome, Safari, etc., you might think that Internet Explorer is not essential or necessary anymore. Some might even say, “Why would I? I already have mine with my favorite add-ons, my plugins and everything I need”.
Let’s face it: Internet Explorer was one of our favorite browsers for many years. First included as an add-on package to Windows 95, it’s been around for quite a while.
I still have fond memories of all the years surfing the web using it, until my dad for some reason switched to Firefox, and so did I. If you want to stick to Internet Explorer, there is a way to make it your default browser.
On the other hand, you might find Internet Explorer (also known as IE) redundant, to the point that they want to erase it from your computer. In this post, you will learn how to completely delete IE.
See also: How to clear the cache in IE11
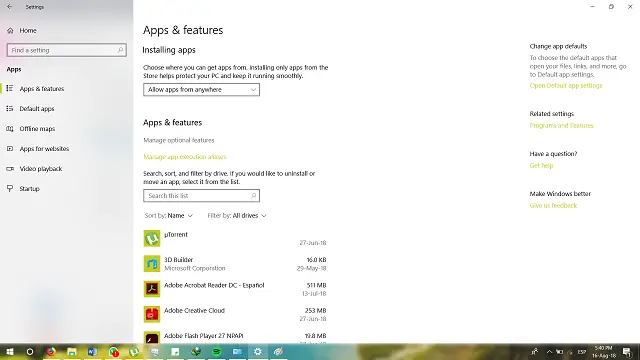
Remove Internet Explorer Using Apps & Features
-
Click on the Windows button and type Apps & Features. Click on it.
-
In the window that opens, click Manage optional features.
- In the list, scroll down until you find Internet Explorer. Select it, and click Uninstall.
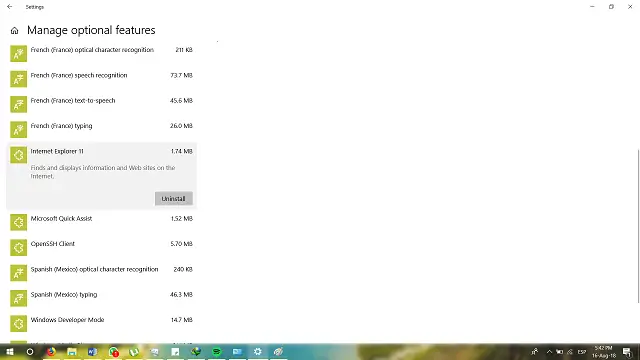
Once uninstalled, you’re good to go!
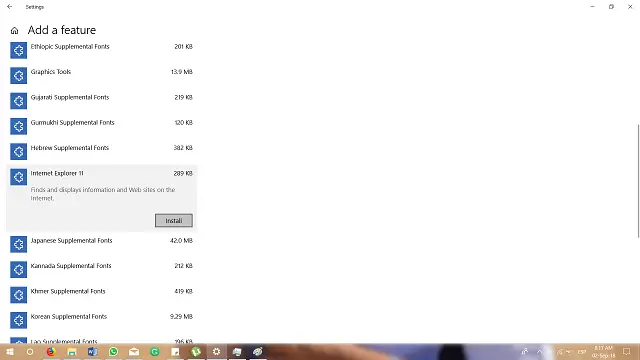
You can re-add it by:
- Going back to Optional Features and clicking on “Add a Feature.” where you will find Internet Explorer available.
-
Select it, press Install, and after the process, It’s back on your computer again.
See also: How to set your Homepage to your favorite website
Removing IE using Windows Features
There is another way to do it, and thanks to Windows Central, we can know-how. It works from Windows Vista to Windows 10.
-
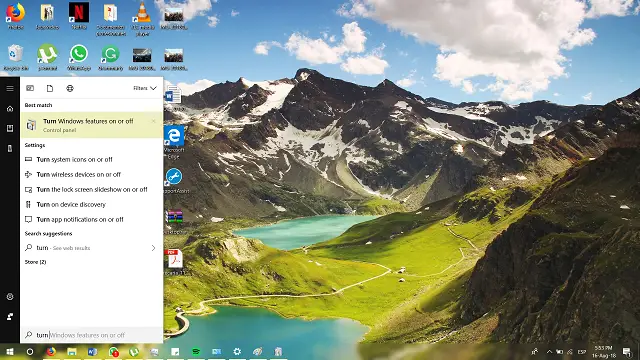
Click on the Windows button, or use the Windows Search Box
-
Type “Turn Windows features on or off.” Click on it.
-
A new window called Windows Features will open.
-
Find Internet Explorer 11 and clear the checkbox.
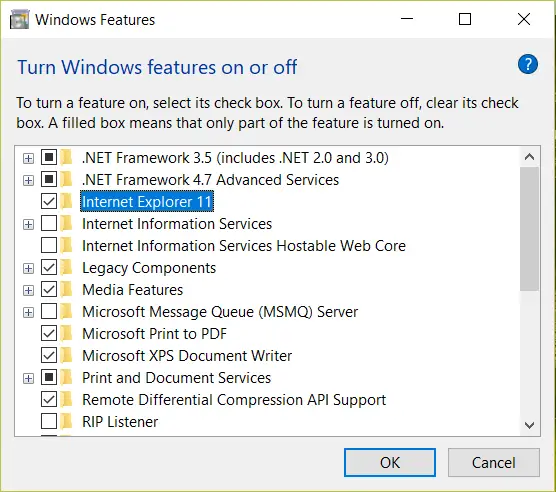
-
Click OK, it will ask you to confirm the action.
-
Press Yes, and restart your computer, IE will no longer be installed.
-
Once more, if you feel like re-adding it, simply follow all the steps again and check the checkbox.
Conclusion
Internet Explorer will always be there from the start in any version of Windows you boot, from Windows 98 to the last versions of Windows 10. It is, after all, the browser flagship of the OS and the Company itself. Whether you like IE or not, it is always useful to know this tip if you plan to perform this task in the future.
Now that you’ve learned how to uninstall (or install Internet Explorer), you can delete it (and re-add it) whenever you want. Who knows? You can use it when necessary.
 Marcos González R.
Marcos is a Venezuelan Writer and Translator living in Argentina. He is a Seventh Day Adventist and is 23 years old. He is a proud culé (F.C. Barcelona fan), a big nerd for Batman (for real, like he knows about the comics and BTAS) and Computer stuff, and a world-class procrastinator. You can find him on Instagram as @marcosdg07.
Show all articles by Marcos